
Creating a table of contents manually can be a pain and consume much more time and attention than it should.((Header image provided by Kaitlyn Baker.))
Fortunately, you can let Word do the heavy lifting by creating a dynamic table of contents that updates automatically with your document.
1. Prepare your document.
Word can manage a table of contents multiple ways. Rather than discussing all of these, I’m going to describe what seems the simplest method.
So for the purposes of this tutorial, I’m going to assume two things:((I’m also assuming you have a current version of Word via Office 365. These instructions are based on v16.0.12430.20046. They should work on other recent versions as well. But you’ll notice greater differences in the process if you have an older version of Word.))
- You’re using heading styles to format the headings within your document.
- You’ve set up the page numbers for your table of contents in Word as described in the Student Supplement for The SBL Handbook of Style.
If either of these isn’t true, update your document accordingly.((If you need to paginate your table of contents differently, however, simply substitute your requirements in the appropriate steps below.)) Then come back here, and go through the steps in the next section to add your table of contents.
2. Add your table of contents.
Once you have your document prepared:
2.1. Create your contents page header.
Place your cursor at the start of the page in your document where you want to insert your table of contents (e.g., the page numbered “ii”).
2.1.1. What SBL Style Requires
Then, type “Contents” at the top of this page. SBL style wants you to
- place this term one inch from the top edge of the page,
- center this heading across the page,
- have the word “Contents” in all uppercase letters, and
- have two blank lines between this heading and the start of your table of contents.((The first three requirements are clear from Melanie Greer Nogalski et al., Student Supplement for The SBL Handbook of Style , Second Edition, ed. Joel M. LeMon and Brennan W. Breed, rev. ed. (Atlanta: SBL, 2015), §3.2. The fourth isn’t explicitly specified in the student supplement. So, in this case, SBL style defers to the authorities for Chicago style. And the spacing between the table of contents heading and the table itself is specified in Kate L. Turabian, A Manual for Writers of Research Papers, Theses, and Dissertations: Chicago Style for Students and Researchers, ed. Wayne C. Booth et al., 9th ed., Chicago Guides to Writing, Editing, and Publishing ( affiliate disclosure; Chicago: University of Chicago Press, 2018), §A.2.1.7.))
2.1.2. How to Produce What SBL Style Requires
From this list, especially items 2–4 follow what SBL style asks for with your document’s primary headings (e.g., “Heading 1”).((Cf. Nogalski et al., Student Supplement, §2.6.)) But you shouldn’t use your primary heading style to format the “Contents” heading. If you do, your automated table of contents will make its first entry “Contents.” :-P
To avoid this issue, however, you can format the “Contents” heading with the “TOC Heading” style. And just like any other style, you can adjust this style’s formatting to meet the requirements of SBL style. That way, it’ll be ready and waiting for you when you need to use it in a new project.
After you’ve typed and formatted this heading, place your cursor on the next line available for text below the heading.

Contents Page Header
2.2. Start inserting your table of contents.
Go to the “References” tab, find the “Table of Contents” section, and click the “Table of Contents” button.
Word has a few different tables of contents predefined. But it’ll probably be easiest for you to use the “Custom Table of Contents…” option at the bottom of the “Table of Contents” button menu.

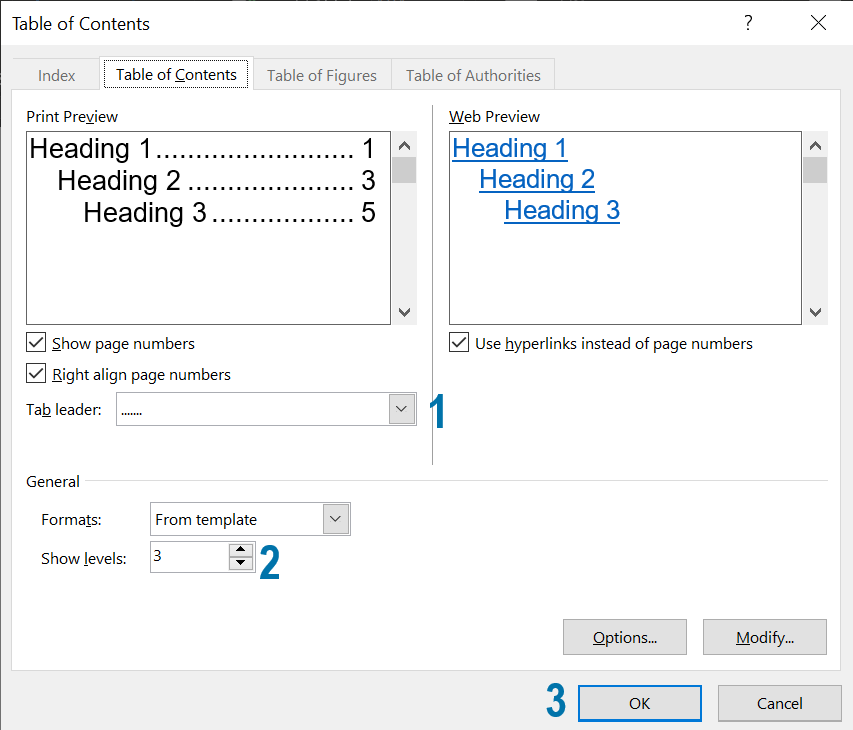
This will open the “Table of Contents” tab in the “Table of Contents” dialog box. (The names are quite creative, aren’t they?)
2.3. Set the basic formatting for your table of contents.
Where you see “Tab leader,” change the option from “……” to “none.”
(If you’re following the Student Supplement, you’ll have the dotted leader only for your primary headings.((Nogalski et al., Student Supplement, §3.2.)) So it’s easiest just to add them there rather than remove them everywhere else.)
Still on the “Table of Contents” tab in the “Table of Contents” dialog box, also find the “Show levels” option. Increase this number to “9.”
You may not have that many heading levels (and probably shouldn’t). But per the Student Supplement, the table of contents should include “every element of the paper that follows.”((Nogalski et al., Student Supplement, §3.2.))
Increasing this number to the maximum now should prevent you from having to change it later or miss headings out of your table of contents.
Click “OK” to create your table of contents.
2.4 Review your initial table of contents.
At this point, you should see a table of contents in your document that looks something like the sample below.

Of course, what the table actually shows will depend on the headings you’ve included in your document.
If you don’t see what you were expecting, double check that you’ve used heading styles in the appropriate places and at the appropriate levels in the body of your document.
Add or change these where necessary (e.g., from “Heading 3” to “Heading 2”).
Also note that the casing for each line in the table of contents will be as it is in that heading, even though the heading might be formatted in all caps.
If you see capitals or lowercase where you were expecting the other, retype that heading in the body of your document, with the proper casing.
Your table of contents will update automatically at different times. But to force an update at any point, right click inside the table, and choose “Update Field,” then “Update entire table,” and click “OK.”
The individual lines of the table of contents are also linked to the corresponding places in your document. So to jump there, just Ctrl + click on a given line in the table.
Conclusion
At this point, you’re saving yourself a huge amount of time and effort managing your table of contents. You’re also able to use the table in Word to skip easily to different parts of your document.
But you may notice that the formatting of the table of contents isn’t yet quite what the Student Supplement is asking for.((Nogalski et al., Student Supplement, §3.2.)) So you’ll want to take careful stock of how the formatting needs to be adjusted, which can be done with styles as well.