
The Student Supplement for The SBL Handbook of Style has some specific requirements for how your essay’s bibliography appears on the page.1
There are any number of common ways to fulfill these requirements that will also make that process harder than it has to be.
Fortunately, you’ve got some much better options for each step in creating a clean bibliography that has a proper
- Top margin,
- Heading,
- Heading spacing,
- First entry formatting,
- Subsequent entry formatting,
- First page pagination, and
- Subsequent page pagination.
Requirements 1, 6–7 (Top Margin, Page Numbering)
You can carefully set up your essay’s pagination. Then, at the end of your essay body, all you need is a new “Section Break (Next Page).” That one insertion will move you to a fresh page to start your bibliography. It will also allow your page numbers to continue in sequence and in the proper places. You can then manipulate the top margin just like for your essay’s first page.
Requirements 2–3 (Heading)
You can specify the bibliography heading alignment, capitalization, and spacing to the first entry within the style for first-level headings.
Requirements 4–5 (Entry Formatting)
You can edit Word’s default “Bibliography” style so that any text you apply it to will have a hanging indentation of 0.5 inches and a blank line following every paragraph formatted with that style.
To do so,2
- Go to the “Home” tab, and find the “Styles” section. You should see an arrow in the lower right corner of the section. Click this to expand the section into a panel.

- If it’s not currently in use, the “Bibliography” style might be hidden by default. To start editing the style, click the “Manage Styles” button at the bottom of the Styles panel.
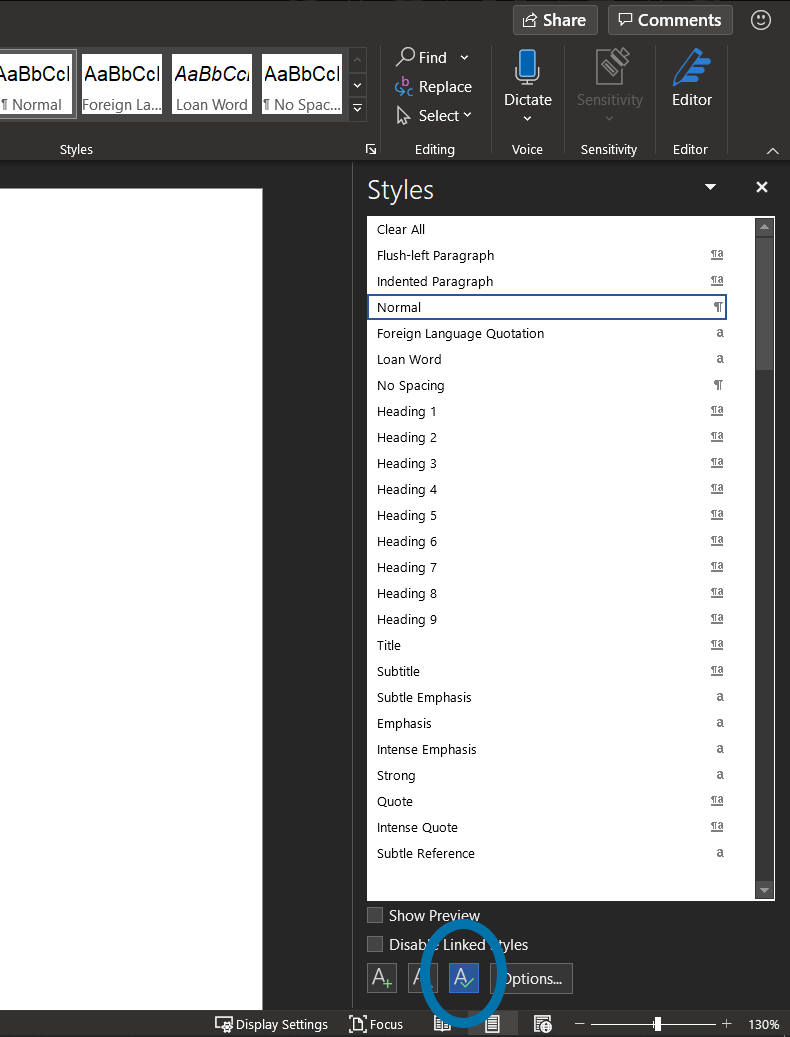
- Sort the list of styles alphabetically. Find the style named “Bibliography.” Then, click “Modify ….”
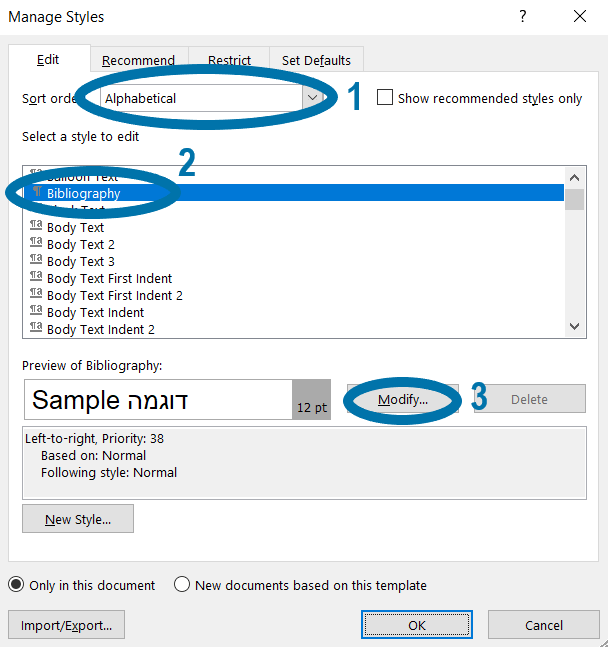
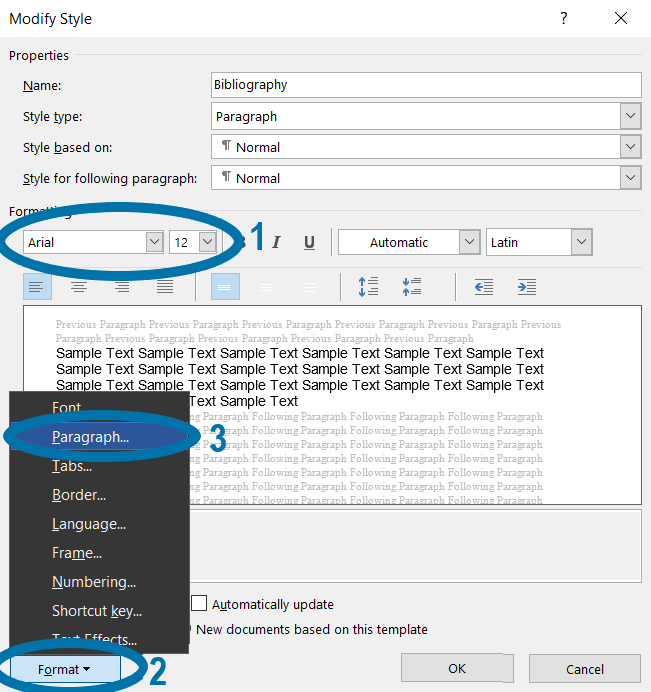
- Double check that the “Bibliography” style is set to use the same font face and font size as you’re using in the rest of your document. If not, make the necessary adjustments. Then, click “Format” in the bottom-left corner of the “Modify Style” dialog box and choose “Paragraph ….”
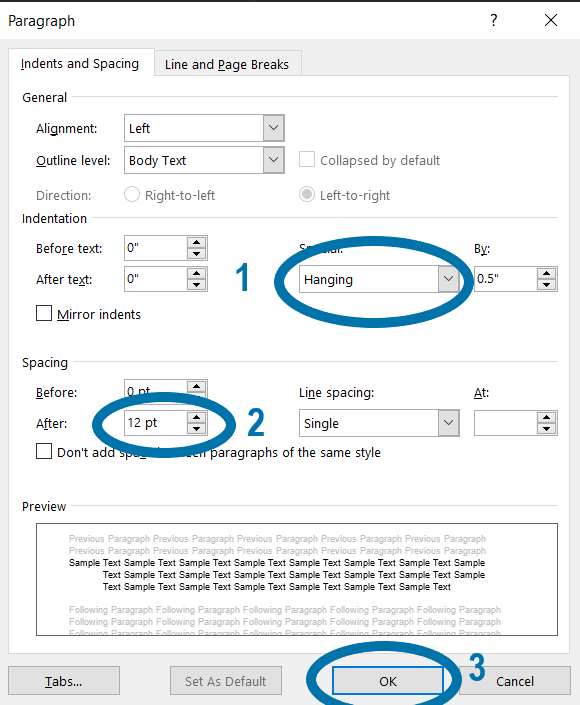
- Under “Indentation,” find the dropdown box for “Special.” Choose “Hanging.” Word will then add 0.5 inches as the indentation distance, which happens to be what the Student Supplement requires. Under “Spacing,” select the number of points you want to add after each paragraph that will equate to one blank line. For example, if you’re using a 12-point font, you might add 12 points after the paragraph.3 Then press “OK.”
- After you’ve gotten the style formatting as you want it, decide whether you’ll want to use this same style formatting in other documents based on the same Word template.4 If so, choose the “New documents based on this template” option at the bottom of the “Modify Style” dialog box.
- Click “OK” to save the style formatting you’ve specified in the “Modify Style” dialog box. Click “OK,” “Cancel,” or the close button in the “Manage Styles” dialog box to return to your document.
Conclusion
Once you’ve edited the “Bibliography” style, you can move the formatting of bibliography paragraphs into the category of things you let Word do for you.
Combined with the other ways you can get Word to help you format a bibliography, this step will give you more consistent formatting with less work and fewer headaches.
And because of that, you can invest your time and attention not into bibliography formatting but into the people and projects that matter most.
Tired of fighting with Word? Want to be done with frustrated hours fussing over how to get the formatting you need?
My new guide shows you how to bypass all of this so you can let Word work for you while you focus on your research.

For students in any graduate program, mastering the full range of available research tools is crucial for efficient and consistent productivity. Dr. Stark has mastered these tools—the most important of which is Microsoft Word…. Students eager to take their work to the next level would do well to follow Dr. Stark’s in-depth guidance.
Header image provided by Freestocks. ↩
Here, I’m assuming you have a current version of Microsoft Word for Windows via Office 365. These instructions are based on v16.0.13127.20164. They should work on other recent versions as well. But you’ll notice greater differences in the process if you have an older version of Word. MacOS users may also notice some differences in these steps between the Windows and Mac versions of Word. ↩
If you’re using a standard font like Arial or Times New Roman, the actual point value for one line is closer to 13.81. For SBL BibLit, it’s closer to 18.67. You can use these values if you’d like to be more precise, but probably no one will fault you for selecting the same number of points spacing as you have for your font size. ↩
For an overview of some helpful ways to work with templates in Word, see my Microsoft Word: The Emerging Biblical Scholar’s Step-by-Step Guide for Windows and MacOS. ↩
Leave a Reply